
Have you been hitting the trail recently, and your disc brakes won’t stop screeching? Any noise coming from the bike will drive ardent cyclists crazy. Moreover, squeaky disc brakes are often a cause for concern because the noise indicates that something’s not right.
Here are a few simple ways to fix squeaky disc brakes:
- Clean the brake rotor.
- Clean and sand down the brake pads.
- Replace worn-out brake pads.
- Align the disc brake calipers.
- Straighten out or replace bent disc brake rotors.
- Ensure the wheel is seated completely and sits straight.
- Replace metal brake pads with resin brake pads.
- Apply anti-squeak disc paste.
- Apply grease to the back of the brake pad.
- Clean the disc brake caliper pistons.
This article will go over the solutions mentioned above in more detail so that you can put an end to the annoying squealing noise coming from your disc brakes.
1. Clean the Brake Rotor
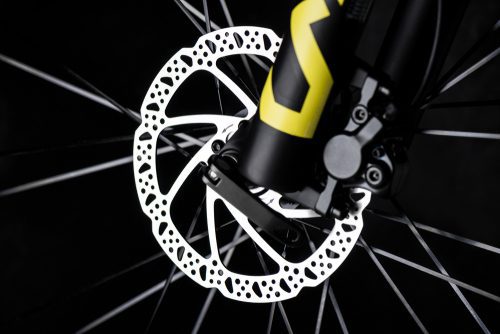
The most common cause of squeaky discs is a dirty rotor. The rotor is a thin piece of metal that rotates together with your wheels. It’s also called a disc because of its distinct shape.
The rotor is exposed to dust, dirt, mud, and other nasty stuff. Unfortunately, riding your favorite mountain trail is the fastest way to get the brake rotors dirty.
The accumulation of dirt creates uneven surfaces on the rotor, which can cause squeaking. It’s also very bad for the general braking performance of your bike.
While you can use special canned cleaners for the discs, it’s not necessary. Liquid soap and warm water are enough to remove any dirt and grease.
It’s best to avoid any chemicals in general to avoid contamination. Also, wear gloves when cleaning discs. The oil on your fingers can contaminate the pads, which may be causing the squeaking in the first place.
You can also use some isopropyl alcohol because it evaporates very quickly. Moreover, hard tap water can leave a thin residue of sediment.

Although you don’t have to remove the disc from the wheel to clean it, it’ll be much easier.
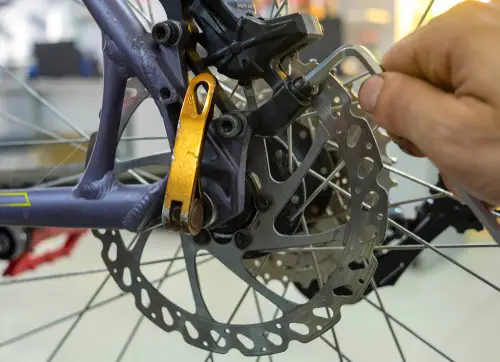
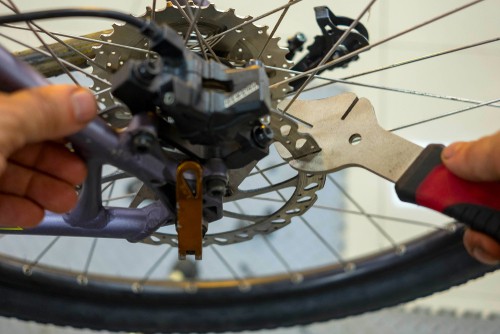
Depending on the disc brake rotor model, you’ll have to use either a T25 Torx screwdriver or a lockring tool.
This excellent video by Park Tool shows how to remove the disc brake rotor from the wheel:
Once you get the disc brake rotor off, here’s how to clean it:
- Put on a pair of rubber gloves.
- Apply soap and warm water or isopropyl alcohol onto the disc.
- If the brake disc is extremely dirty, soak it for 10-15 minutes.
- Rinse the disc thoroughly using isopropyl alcohol or water.
- Wipe off the brake disc using a clean, dry towel.
Continue wearing rubber gloves from start to finish. The last thing you want is a fingerprint to contaminate the surface after you spent the last 20 minutes cleaning it.
2. Clean and Sand Down the Brake Pads
Before we talk about cleaning the brake pads, we first have to explain the different types.
The most common are metal and resin pads. Both are relatively good at self-cleaning, but they sometimes need some extra help.
More importantly, resin pads tend to get glazed. This happens when you hold the brake for too long. The friction causes the resin to heat up and melt.
This results in a completely shiny surface that can’t create enough friction to stop the bike. In addition to squealing, the brake pad won’t be able to brake properly.
Metal pads are resilient to glazing, but their surface can get too shiny as well.
Another huge problem is contamination. This only happens with organic and semi-organic pads.
If a blob of chain grease or some other oily substance ends up on the pad, it’ll get contaminated.
So, what can you do about glazed, dirty, or contaminated brake pads?
You can clean, sand, and deglaze the pads with a blowtorch or lighter. Here’s how:
- Put on a pair of clean rubber gloves. This isn’t optional because you don’t want to contaminate the pads.
- Remove the pad pin clip and retaining pin. If your brakes use a spring instead of a retaining pin, remove it. Some designs use clips on the pads instead of a spring or a retaining pin.
- Slide the pads out.
- Clean the pads with isopropyl alcohol and a clean, dry towel. Don’t use paper towels as they might leave bits of paper on the surface.
- Use a file or 150-grit sandpaper to remove the top layer of the brake pad. Don’t push hard because you don’t want to waste the pad material. Also, don’t use fine sandpaper because it’ll make the surface too polished.
- If the brake pad is contaminated, use a blowtorch to burn off oils. You can also pour a bit of isopropyl alcohol and set it on fire. Be careful not to burn yourself. It’s best to do this outside on concrete.
3. Replace Worn-Out Brake Pads
If it’s been years since you first bought the disc brakes, it’s probably time to replace them.
Just like regular bike brakes, brake pads wear out over time. Old, thin brake pads make a horrible noise when you brake, no matter how clean they are.
With regular bike brakes, you can tell that they need replacing when the grooves are gone. But disc brakes don’t have those grooves.
Instead, look at the thickness of the pad material. It’s the part of the pad that makes contact with the disc.
If it’s almost non-existent or not worn out evenly, you’ll have to replace it.
If one side of the pad is much thicker than the other, that could also cause squeaking. You can’t fix uneven wear without removing a lot of material. So, it’s best to replace the pads altogether.
A great replacement is the Zonon Semi-Metallic Brake Pads (Amazon.com). They’re noiseless, wear-resistant, and brake extremely well. Double-check for compatibility before buying, but they work with most Shimano Deore brakes.
Here is a good YouTube video on replacing disc brake pads:
4. Align the Disc Brake Calipers
If your brake pads are clean, oil-free, and not worn out, a misaligned brake caliper might be causing the squeaking.
The ear-piercing noise happens because only one part of the pad is making contact. The other part acts as a resonance chamber, amplifying the horrible squeal.
Disc brake calipers usually self-align as you use them. But they can get knocked out of place on intense rides, so it’s important to inspect them from time to time.
You can tell that the calipers aren’t centered by spinning your wheel when the bike is on a stand or upside-down.
If the wheel isn’t turning freely, that means the brake pads are touching the disc and causing friction.
Double-check by looking at the pads from the front. If the pad’s surface isn’t parallel to the disc, the calipers need to be adjusted.
Thankfully, centering the calipers only takes a second. Grab the correct Allen wrench or screwdriver for the caliper bolts. Here’s what you do next:
- Slightly loosen the two caliper bolts on each side.
- Squeeze the brake as hard as you can. This realigns the caliper.
- Holding the brake squeezed, retighten the nuts.
- Release the brake and check whether the pads are centered.
I found this video on YouTube on centering disc brakes:
5. Straighten Out or Replace Bent Disc Brake Rotors
The brake rotor can get bent easily when the bike falls over. Hard braking is unlikely to bend it, but it can happen if the wheel hits a bump.
A bent disc brake rotor can get squeaky because the pad isn’t making even contact when braking.
The easiest way to check if the disc brake is bent is to prop your bike up on a stand or turn it upside-down. Spin the wheel and look at the disc brake.
If it doesn’t go in a straight line or looks like it wobbles, there’s a good chance it’s bent.
You can try to straighten out the bent rotor using an adjustable or monkey wrench. Sadly, you may have to replace the disc altogether if it’s too warped.
You can replace the rotor on its own, which is much cheaper than getting the whole kit.
The Shimano Disc Brake Rotor (Amazon.com) is compatible with most Shimano brakes. You should only use resin pads with it, though.
6. Ensure the Wheel Is Seated Completely and Sits Straight
Sometimes it’s not the disc brake rotor or caliper that’s misaligned – it’s the wheel.
If the wheel isn’t completely seated on the skewer, it can cause all sorts of issues. Brake squeak is the least of your worries because the wheel could fall off altogether!
If your bike uses a quick-release lever, make sure it’s completely closed. Do this by turning the lever clockwise so that it’s hand-tight. Next, close the lever by turning it to the other side using some amount of force.
Also, ensure the wheel is firmly seated in the axle fork in the first place.
If your wheel uses regular nuts and bolts instead of a quick-release lever, tighten it with a wrench.
7. Replace Metal Brake Pads With Resin Brake Pads
Metal brake pads are fantastic. They last a very long time and don’t suffer from contamination issues.
However, metal-on-metal contact is inherently super loud. Cheap metal brake pads are especially loud, so avoid them entirely.
Moreover, fine metal dust will coat your rotator over time, which can be yet another source of squeaking.
Resin brake pads are much quieter because they’re relatively soft. High-quality organic brake pads are so quiet that you won’t even hear them.
8. Apply Anti-squeak Disc Paste
If you’ve used “anti-squeak” products on your car brake rotor before, you’ll know how effective it is.
It reduces friction between the rotor and the brake pads.
However, you can’t use any anti-squeak lubricant on your bicycle disc brakes. Most of these products will contaminate the resin pads, ruining them in the process.
Instead, get something that’s specially made for bikes.
A popular product is the PV BIKE WORKS Squeal Out Paste (Amazon.com). Reviews claim that squeaking goes away instantly after spreading a thin layer of paste on the disc. Moreover, the large 3 oz (85.04 g) jar is enough to last a lifetime.

9. Apply Grease to the Back of the Brake Pad
After all that talk about how oil can contaminate the brake pads, you’d be justified to think that greasing your pads is the last thing you’d want to do.
And it is, so only do this if the squeaking won’t go away no matter what you do.
The noise may be coming from the point where the pad attaches to the caliper.
So, the solution is to apply a bit of water-resistant grease that won’t melt to the back of the brake pad.
The solution is simple:
- Remove the pads.
- Use a cotton swab or toothpick to apply a thin layer of grease on the back of the pads.
- Slide them back in.
Wear rubber gloves and be very careful when applying the grease. A small drop of oil on the side of the pad is enough to render it useless.
Again, don’t do this unless you’re 100% sure that the noise is coming from the caliper.
10. Clean the Disc Brake Caliper Pistons
Cleaning the disc brake pistons fixes the same issue that greasing the back of the pad does.
A bit of dirt or mud can get stuck between the piston and the pad, which can cause uneven braking and squeaking.
Cleaning the pistons is fairly easy. Here’s how to do it:
- Remove the disc brake pads.
- Press the brake to expose the pistons.
- Apply isopropyl alcohol.
- Use a cotton swab to remove dirt and grime buildup.
- Place the disc brake pads back in.
- Test the brakes
Final Thoughts
Squeaky disc brakes are a common issue that all cyclists face at some point or another. The most common problem is dirty or contaminated brake pads.
Misaligned calipers and bent disc brake rotors can also cause squeaking because it causes uneven braking.
Easy solutions include:
- Cleaning and degreasing or replacing the pads.
- Straightening or replacing the disc brake rotor.
- Applying anti-squeak paste.
- Cleaning and greasing the caliper pistons.
Related articles:
13 Pros and Cons of Bicycle Disc Brakes